PrimeVue框架–Steps组件使用 1. 组件简介
PrimeVue
Steps 组件是向导工作流中步骤的指示器。
https://www.primefaces.org/primevue/steps
通常称为 步骤条, 步进条
按理来说,组件的使用直接参考官方文档即可,不需要记录到博客。
但是 PrimeVue 的步骤条与 Element 框架点区别,PrimeVue 的步骤条是基于 Vue Router 的,之前没有接触过,使用过程中踩了一两个坑,所以还是打算用博客的形式记录一下使用方法,供日后参考,而不是苦哈哈的再去研究官方文档💀
2. 使用方法
小提示 :
所有代码都基于Vue3项目,所以确保您拥有一个vue3项目
如果您没有,请使用 Vue-CLI 创建,参考:https://cli.vuejs.org/zh/guide/creating-a-project.html
创建一个Vue3项目
1 [mf~/project/demo] $ vue create primevue-steps
选择Vue3选项
1
2
3
4
5
6
7
8
9
10
11
12
Vue CLI v4.5.15
等待创建完成
1
2
3
4
5
6
7
8
9
10
11
12
13
14
15
16
17
18
19
20
21
22
23
24
Vue CLI v4.5.15in /home/mf/project/demo/primevue-steps.while ...in 1min 13scd primevue-stepsin git config, or failed to sign commit.
创建完成后,切换到项目目录(例子中是 /home/mf/project/demo/primevue-steps)
2.1 安装 Vue Router 由于 steps组件 是基于 Vue Router 的,所以使用前需要安装 Vue Router
1 npm install vue-router@4
1
2
3
4
5
6
7
8
9
10
11
12
13
14
15
16
[mf~/project/demo/primevue-steps] (master) $ npm install vue-router@4in 18sfor fundingfor detailsdo not require attention, run:for details.
2.2 安装 PrimeVue 1 2 npm install primevue@^3.15.0 --save
1 2 3 4 5 6 7 8 9 10 11 12 13 14 15 16 17 18 19 20 21 22 23 24 25 26 27 28 29 30 31 32 33 [mf~/project/demo/primevue-steps] (master) $ npm install primevue@^3.15.0 --savein 17sfor fundingfor detailsdo not require attention, run:for details.date , audited 1376 packages in 9sfor fundingfor detailsdo not require attention, run:for details.
2.2 创建测试视图(view) 在 primevue-steps/src/ 目录下创建目录 views,用于存储视图(primevue-steps/src/views),在此目录下创建视图文件 TestView.vue
1 2 3 4 5 6 7 8 9 10 11 12 13 <template > <h3 > PrimeVue Steps 组件测试视图</h3 > </template > <script > export default { name : 'TestView' , components : {}, setup ( } } </script >
2.3 为项目引入路由并为测试视图创建一个路由 在 primevue-steps/src/ 目录下创建目录 router,用于存储路由文件(primevue-steps/src/router),在此目录下创建路由文件 index.js
1 2 3 4 5 6 7 8 9 10 11 12 13 14 15 16 17 18 19 20 21 22 23 24 25 import { createRouter, createWebHistory } from "vue-router" ;import HelloWorld from "@/components/HelloWorld" import TestView from "@/views/TestView" const routes = [name : "index" ,path : "/" ,component : HelloWorld name : "testView" ,path : "/tv" ,component : TestView const router = createRouter ({history : createWebHistory (),export default router;
路由文件创建完成,在 primevue-steps/src/main.js 文件中导入并使用路由
1 2 3 4 5 6 7 8 9 10 11 import { createApp } from 'vue' import App from './App.vue' import router from '@/router' import 'primeicons/primeicons.css' import 'primevue/resources/primevue.min.css' import 'primevue/resources/themes/saga-blue/theme.css' createApp (App ).use (router).mount ('#app' )
最后在 primevue-steps/src/App.vue 中注释掉默认内容,插入 <router-view></router-view> 标签,路由所对应的组件/视图都将渲染到此处
1 2 3 4 5 6 7 8 9 10 11 12 13 14 15 16 17 18 19 20 21 22 23 24 25 26 27 28 <template > <router-view > </router-view > </template > <script > export default { name : 'App' , components : { } } </script > <style > #app { font-family : Avenir, Helvetica, Arial, sans-serif; -webkit-font-smoothing : antialiased; -moz-osx-font-smoothing : grayscale; text-align : center; color : #2c3e50 ; margin-top : 60px ; } </style >
启动测试服务器
1 2 3 4 5 6 7 8 9 10 [mf~/project/demo/primevue-steps] (master) $ npm run servein 300ms 11:39:34 AM
2.4 在测试视图中引入Steps组件并使用
知识点:
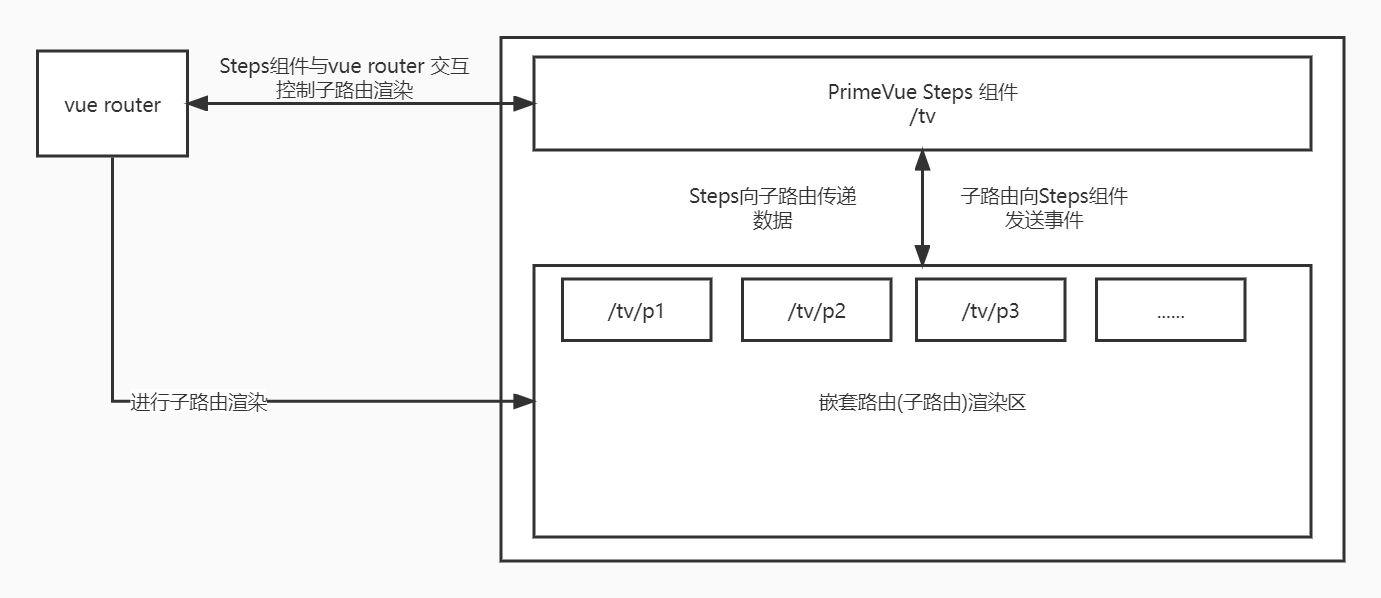
PrimeVue中Steps组件的步骤组件切换使用嵌套路由实现,关系图如下:
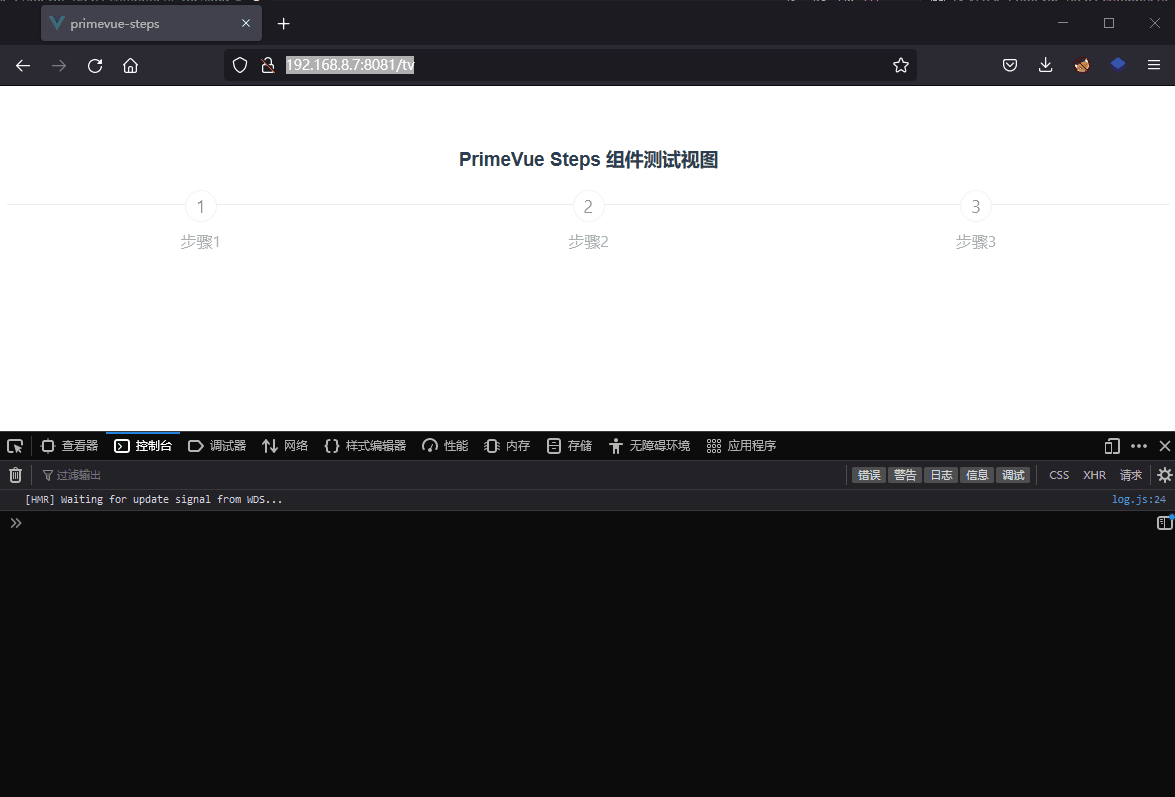
2.4.1 在测试视图中使用steps组件 1 2 3 4 5 6 7 8 9 10 11 12 13 14 15 16 17 18 19 20 21 22 23 24 25 26 27 28 29 30 31 32 33 34 35 36 37 38 39 40 41 42 43 44 45 46 47 48 49 50 51 52 53 54 55 56 57 58 59 60 61 62 63 64 65 66 67 68 69 70 71 72 73 74 75 76 77 78 79 80 81 82 83 84 85 86 87 88 89 <template > <h3 > PrimeVue Steps 组件测试视图</h3 > <Steps :model ="stepsItems" :readonly ="true" /> <router-view v-slot ="{ Component }" :formData ="formObject" @prevPage ="prevPage($event)" @nextPage ="nextPage($event)" @complete ="complete($event)" > <keep-alive > <component :is ="Component" /> </keep-alive > </router-view > </template > <script > import { ref } from 'vue' import { useRouter } from 'vue-router' import Steps from 'primevue/steps' export default { name : 'TestView' , components : { Steps }, setup ( const router = useRouter () const stepsItems = ref ([ { label : '步骤1' , to : '/tv/p1' }, { label : '步骤2' , to : '/tv/p2' }, { label : '步骤3' , to : '/tv/p3' }, ]) const formObject = ref ({ msg : 'Steps数据' }) const nextPage = (data ) => { console .info (`Steps: ${stepsItems.value[data.value.index].label} 传递的数据` , data.value ) router.push (stepsItems.value [data.value .index + 1 ].to ); } const prevPage = (data ) => { router.push (stepsItems.value [data.value .index - 1 ].to ); }; const complete = (data ) => { console .info (`Steps: ${stepsItems.value[data.value.index].label} 传递的数据` , data.value ) alert ('步骤完成' ) }; return { stepsItems, formObject, nextPage, prevPage, complete } } } </script >
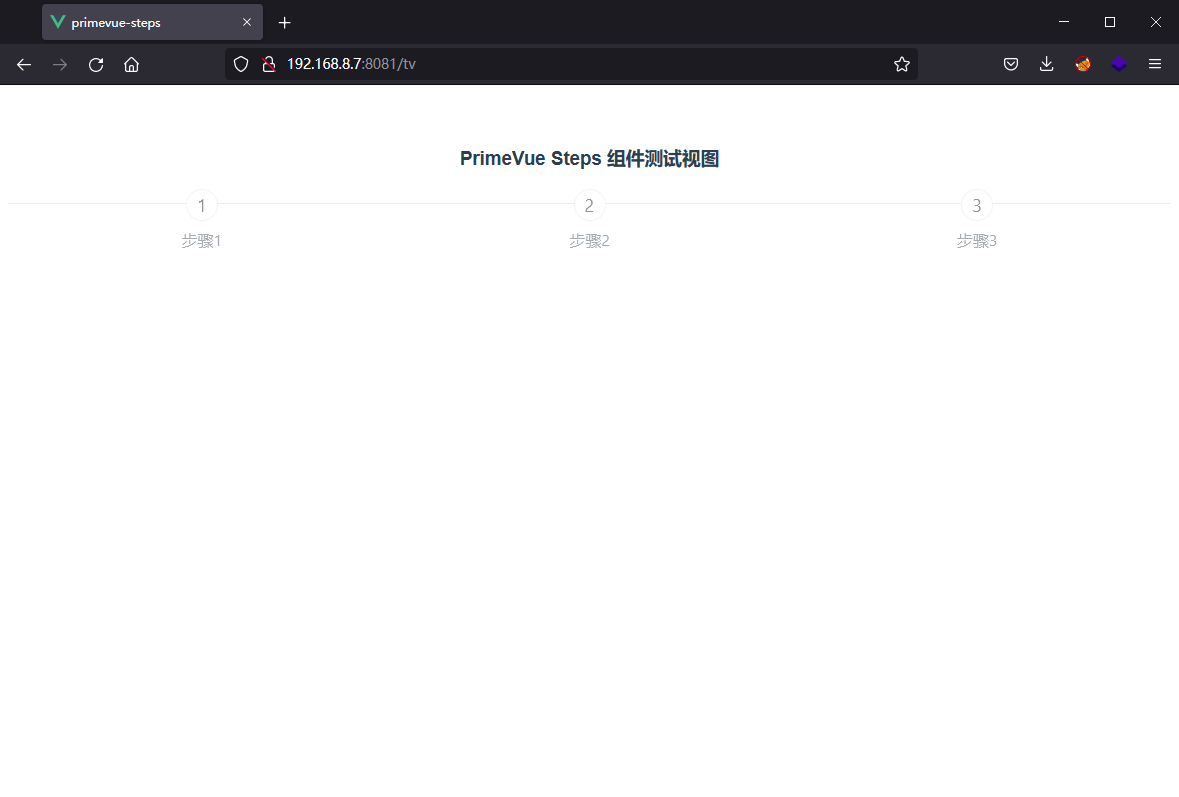
访问 /tv ,可以看到步骤条已经创建。
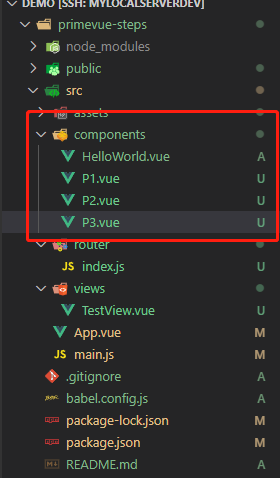
2.4.2 创建子路由组件 在 primevue-steps/src/components 目录下创建路由文件三个组件提供个steps组件使用
P1.vue
1 2 3 4 5 6 7 8 9 10 11 12 13 14 15 16 17 18 19 20 21 22 23 24 25 26 27 28 29 30 31 32 33 34 35 36 37 38 39 40 41 42 43 44 45 46 47 48 49 50 51 52 53 54 55 56 57 <template > <div > <h4 > 步骤一:/tv/p1</h4 > <button @click ="nextPage" > 下一步</button > </div > </template > <script > import {ref} from 'vue' export default { name : 'P1' , components : { }, props : { formData : Object }, emits : ['prevPage' , 'nextPage' , 'complete' ], setup (props, ctx ) { console .log ('步骤一, Steps传递的数据:' , props.formData ) const data = ref ({ formData : { msg : '我是步骤一' }, index : 0 }) const nextPage = ( ctx.emit ('nextPage' , data) } return { nextPage } } } </script > <style scoped > div { width : 100% ; height : 100px ; border-radius : 10px ; margin-top : 10px ; box-shadow : 0px 0px 10px 5px #666666 ; } </style >
P2.vue
1 2 3 4 5 6 7 8 9 10 11 12 13 14 15 16 17 18 19 20 21 22 23 24 25 26 27 28 29 30 31 32 33 34 35 36 37 38 39 40 41 42 43 44 45 46 47 48 49 50 51 52 53 54 55 56 57 58 59 60 61 62 63 64 65 <template > <div > <h4 > 步骤二:/tv/p2</h4 > <button @click ="prevPage" > 上一步</button > <button @click ="nextPage" > 下一步</button > </div > </template > <script > import {ref} from 'vue' export default { name : 'P2' , components : { }, props : { formData : Object }, emits : ['prevPage' , 'nextPage' , 'complete' ], setup (props, ctx ) { console .log ('步骤二, Steps传递的数据:' , props.formData ) const data = ref ({ formData : { msg : '我是步骤二' }, index : 1 }) const nextPage = ( ctx.emit ('nextPage' , data) } const prevPage = ( ctx.emit ('prevPage' , data) } return { nextPage, prevPage } } } </script > <style scoped > div { width : 100% ; height : 100px ; border-radius : 10px ; margin-top : 10px ; box-shadow : 0px 0px 10px 5px #666666 ; } </style >
P3.vue
1 2 3 4 5 6 7 8 9 10 11 12 13 14 15 16 17 18 19 20 21 22 23 24 25 26 27 28 29 30 31 32 33 34 35 36 37 38 39 40 41 42 43 44 45 46 47 48 49 50 51 52 53 54 55 56 57 58 59 60 61 62 63 64 65 <template > <div > <h4 > 步骤三:/tv/p3</h4 > <button @click ="prevPage" > 上一步</button > <button @click ="complete" > 完成/确定</button > </div > </template > <script > import {ref} from 'vue' export default { name : 'P3' , components : { }, props : { formData : Object }, emits : ['prevPage' , 'nextPage' , 'complete' ], setup (props, ctx ) { console .log ('步骤三, Steps传递的数据:' , props.formData ) const data = ref ({ formData : { msg : '我是步骤三' }, index : 2 }) const prevPage = ( ctx.emit ('prevPage' , data) } const complete = ( ctx.emit ('complete' , data) } return { prevPage, complete } } } </script > <style scoped > div { width : 100% ; height : 100px ; border-radius : 10px ; margin-top : 10px ; box-shadow : 0px 0px 10px 5px #666666 ; } </style >
2.4.3 为子路由组件指定路由地址 修改路由文件 primevue-steps/src/router/index.js,为TestView视图添加子路由
1 2 3 4 5 6 7 8 9 10 11 12 13 14 15 16 17 18 19 20 21 22 23 24 25 26 27 28 29 30 31 32 33 import { createRouter, createWebHistory } from "vue-router" ;import HelloWorld from "@/components/HelloWorld" import TestView from "@/views/TestView" import P1 from "@/components/P1" import P2 from "@/components/P2" import P3 from "@/components/P3" const routes = [name : "index" ,path : "/" ,component : HelloWorld name : "testView" ,path : "/tv" ,component : TestView ,children : [path : 'p1' , component : P1 },path : 'p2' , component : P2 },path : 'p3' , component : P3 },const router = createRouter ({history : createWebHistory (),export default router;
完成后刷新页面并访问路径 /tv/p1,即可看到步骤页
3. 演示Demo 文章中所用的测试Demo已经推送到github:https://github.com/mangfu26/blog-share/tree/primevue-steps
你可以使用以下命令克隆使用
1 git clone -b primevue-steps https://github.com/mangfu26/blog-share.git primevue-steps