增加LVM逻辑卷容量

阅读声明:我个人是个 Linux 小白,写博客只是记录下日常工作中的一些问题和解决方案,如果文章中出现错误还请大佬勿喷

1、什么是 LVM ?

关于 LVM 的概念和说明,可以参考文章 LVM——让Linux磁盘空间的弹性管理 - 知乎 (zhihu.com)作为所有操作后

这里只简单介绍一些相关概念

LVM 简介:

LVM(Logical Volume Manager),中文名称叫 逻辑卷管理,是在物理 磁盘/分区上 做整合再划分逻辑分区的机制(或者说磁盘管理技术)

1
2
3
4
5
6
7
8
9
10
11
+-----------------------------------------------+
| 逻辑分区1 | 逻辑分区2 | 逻辑分区3 | 逻辑分区n .. |
+-----------------------------------------------+
^ ^
+-----------------------------------------------+
| 卷组 |
+-----------------------------------------------+
^ ^
+-----------------------------------------------+
| 物理卷1 | 物理卷2 | 物理卷n ... |
+-----------------------------------------------+

相关概念:

  • PV(Physical Volume):物理卷,在磁盘分区的基础上建立
  • VG(Volume Group):卷组,管理/整合 多个 PV
  • LV(Logical Volume):逻辑卷,在 VG 的基础上划分的逻辑分区
1
2
3
4
5
6
7
8
9
10
11
+-----------------------------------------------+
| LV1 | LV2 | LV3 | LV n .. |
+-----------------------------------------------+
^ ^
+-----------------------------------------------+
| VG |
+-----------------------------------------------+
^ ^
+-----------------------------------------------+
| PV1 | PV2 | PV n ... |
+-----------------------------------------------+

我个人理解: LVM 就是个将多个物理磁盘或者分区整合为一个逻辑磁盘再分区的机制/技术,这样比传统的磁盘分区更易用,并且将多个磁盘整合为一个逻辑上磁盘来使用可以突破单个物理磁盘的容量限制

2、LVM 扩容过程

所有操作都需要 root 权限,请在 root 用户下进行或者使用具有 root 权限的用户进行操作
文章中的所有操作均在 root 用户下进行

! ! ! ! ! !
磁盘操作有风险,如果你需要扩容的是虚拟机,请给虚拟机打个快照,如果你使用的是物理机,请事先备份你的数据

2.1、原因

由于个人喜欢在日常生活中写点小项目和代码,所以在公司内网的 ESXI 上建了个 Ubuntu 20.04 Server 作为开发服务器,公司的代码存放在上面,个人代码存储在自己的笔记本上。

今天照旧用 VS Code 远程到开发服务器上写代码时提示存储空间不够,故需要扩容,但是扩容过程一波三折,写篇文章记录下,以后碰到相关问题时可以参考

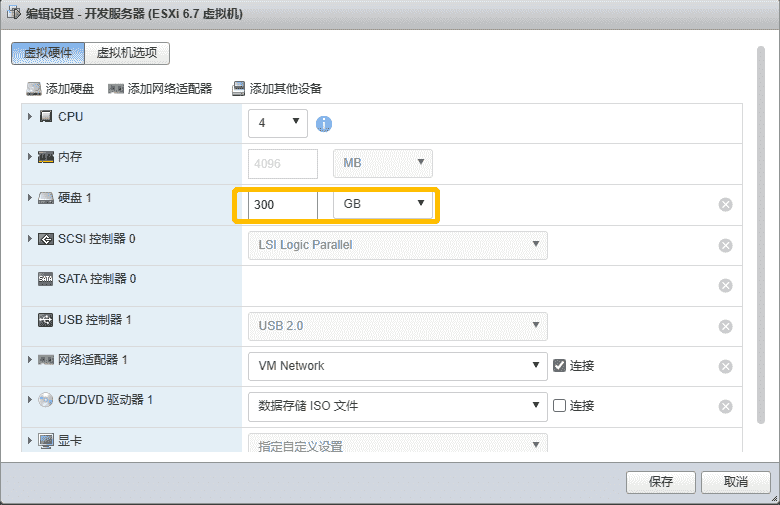
2.2、增加虚拟机的磁盘容量

首先在 ESXI 管理面板上增加虚拟机的容量

我这里的原容量为 100G 现改为 300G

如果修改不了,你可能需要将虚拟机关机后修改再将虚拟机开机

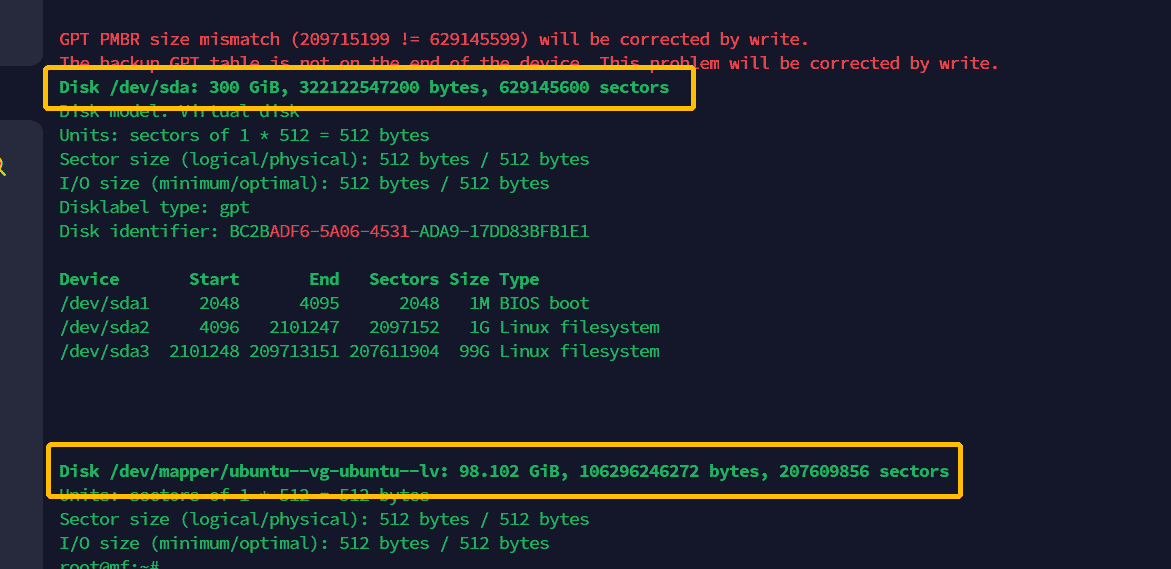
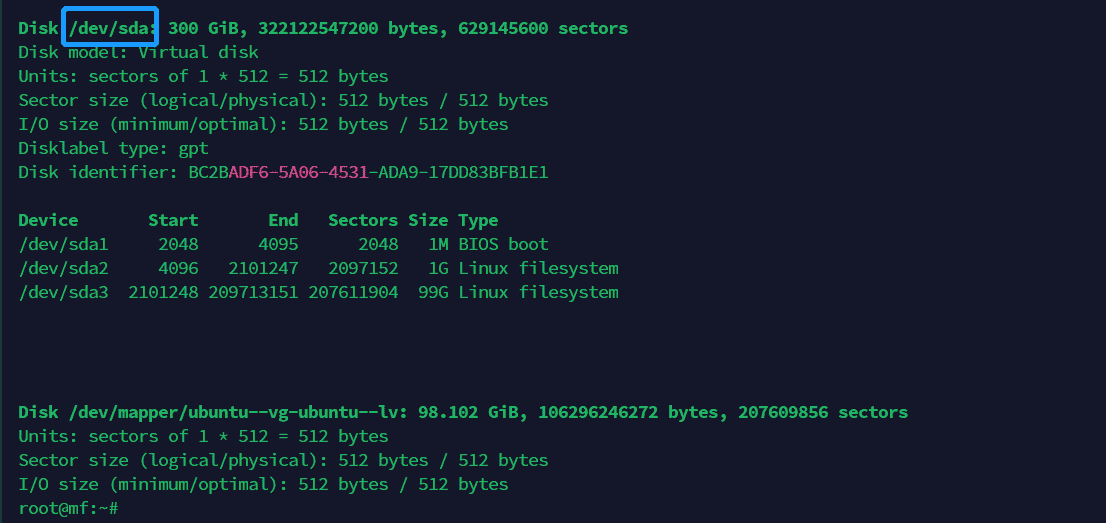
2.3、在空闲空间上建立 PV(物理卷)

2.3.1、查看当前分区信息

使用命令 fdisk -l 查看当前物理磁盘的分区信息

1
2
3
4
5
6
7
8
9
10
11
12
13
14
15
16
17
18
19
20
21
22
23
24
25
26
27
28
29
30
31
32
33
34
35
36
37
38
39
40
41
42
43
44
45
46
47
48
49
50
51
52
53
54
55
56
57
58
59
60
61
62
63
64
65
66
67
68
69
70
71
root@mf:~# fdisk -l
Disk /dev/loop0: 55.62 MiB, 58310656 bytes, 113888 sectors
Units: sectors of 1 * 512 = 512 bytes
Sector size (logical/physical): 512 bytes / 512 bytes
I/O size (minimum/optimal): 512 bytes / 512 bytes


Disk /dev/loop1: 55.62 MiB, 58310656 bytes, 113888 sectors
Units: sectors of 1 * 512 = 512 bytes
Sector size (logical/physical): 512 bytes / 512 bytes
I/O size (minimum/optimal): 512 bytes / 512 bytes


Disk /dev/loop2: 63.28 MiB, 66347008 bytes, 129584 sectors
Units: sectors of 1 * 512 = 512 bytes
Sector size (logical/physical): 512 bytes / 512 bytes
I/O size (minimum/optimal): 512 bytes / 512 bytes


Disk /dev/loop3: 63.29 MiB, 66355200 bytes, 129600 sectors
Units: sectors of 1 * 512 = 512 bytes
Sector size (logical/physical): 512 bytes / 512 bytes
I/O size (minimum/optimal): 512 bytes / 512 bytes


Disk /dev/loop4: 91.83 MiB, 96272384 bytes, 188032 sectors
Units: sectors of 1 * 512 = 512 bytes
Sector size (logical/physical): 512 bytes / 512 bytes
I/O size (minimum/optimal): 512 bytes / 512 bytes


Disk /dev/loop5: 91.85 MiB, 96292864 bytes, 188072 sectors
Units: sectors of 1 * 512 = 512 bytes
Sector size (logical/physical): 512 bytes / 512 bytes
I/O size (minimum/optimal): 512 bytes / 512 bytes


Disk /dev/loop6: 49.85 MiB, 52248576 bytes, 102048 sectors
Units: sectors of 1 * 512 = 512 bytes
Sector size (logical/physical): 512 bytes / 512 bytes
I/O size (minimum/optimal): 512 bytes / 512 bytes


Disk /dev/loop7: 49.86 MiB, 52260864 bytes, 102072 sectors
Units: sectors of 1 * 512 = 512 bytes
Sector size (logical/physical): 512 bytes / 512 bytes
I/O size (minimum/optimal): 512 bytes / 512 bytes


GPT PMBR size mismatch (209715199 != 629145599) will be corrected by write.
The backup GPT table is not on the end of the device. This problem will be corrected by write.
Disk /dev/sda: 300 GiB, 322122547200 bytes, 629145600 sectors
Disk model: Virtual disk
Units: sectors of 1 * 512 = 512 bytes
Sector size (logical/physical): 512 bytes / 512 bytes
I/O size (minimum/optimal): 512 bytes / 512 bytes
Disklabel type: gpt
Disk identifier: BC2BADF6-5A06-4531-ADA9-17DD83BFB1E1

Device Start End Sectors Size Type
/dev/sda1 2048 4095 2048 1M BIOS boot
/dev/sda2 4096 2101247 2097152 1G Linux filesystem
/dev/sda3 2101248 209713151 207611904 99G Linux filesystem


Disk /dev/mapper/ubuntu--vg-ubuntu--lv: 98.102 GiB, 106296246272 bytes, 207609856 sectors
Units: sectors of 1 * 512 = 512 bytes
Sector size (logical/physical): 512 bytes / 512 bytes
I/O size (minimum/optimal): 512 bytes / 512 bytes

可以看到在 ESXI 中的修改生效了,磁盘空间已经是 300G

虽然磁盘大小改变了,但是我们的 LVM 的逻辑分区大小依旧是 100G 的空间

在介绍 LVM 的时候我们说过,LV(逻辑卷) 是从 VG(卷组) 中划分出来的,而 VG(卷组) 的容量又是其管理的一个或者多个 PV(物理卷)的总和

所以增加 LV(逻辑卷)的前提那肯定是增加 VG(卷组)下 PV(物理卷)的容量或者添加新的 PV(物理卷)来增加 VG(卷组)的容量,只有 VG(卷组)的容量增加了,才有多余的空间划分给 LV(逻辑卷)

所以现在需要做的就是将磁盘的空闲空间(也就是 300G - 100G = 200G)初始化为 PV(物理卷)然后添加到 VG(卷组) 中去

2.3.2、创建新分区

使用命令 fdisk /dev/sda 将磁盘的空闲空间划分为新的分区

需要注意:/dev/sda 是我本地磁盘的名称,你的磁盘名称不一定是这个,如不一致需要替换为你自己的磁盘名称

1
2
3
4
5
6
7
8
9
10
11
12
13
14
15
16
17
18
19
20
21
22
23
24
25
26
27
28
29
30
31
32
33
34
35
36
37
38
39
40
41
42
43
44
45
46
47
48
49
50
51
52
53
54
55
56
57
58
59
60
61
62
63
64
65
66
root@mf:~# fdisk /dev/sda

Welcome to fdisk (util-linux 2.34).
Changes will remain in memory only, until you decide to write them.
Be careful before using the write command.

# 在创建新分区前,你可以使用 fdisk 的 p 命令查看当前磁盘上的分区
# 可以看到我目前有 3 个分区,分别是:
# /dev/sda1
# /dev/sda2
# /dev/sda3
Command (m for help): p

Disk /dev/sda: 300 GiB, 322122547200 bytes, 629145600 sectors
Disk model: Virtual disk
Units: sectors of 1 * 512 = 512 bytes
Sector size (logical/physical): 512 bytes / 512 bytes
I/O size (minimum/optimal): 512 bytes / 512 bytes
Disklabel type: gpt
Disk identifier: BC2BADF6-5A06-4531-ADA9-17DD83BFB1E1

Device Start End Sectors Size Type
/dev/sda1 2048 4095 2048 1M BIOS boot
/dev/sda2 4096 2101247 2097152 1G Linux filesystem
/dev/sda3 2101248 209713151 207611904 99G Linux filesystem

# 使用 fdisk 的 n 命令创建一个分区
Command (m for help): n
# 然后会提示你设置分区数字,因为我已经存在了 3 个分区,所以这里 fdisk 默认给我
# 设置了分区数字为 4,这样建立后的分区就是 /dev/sda4
# 这里我选择默认,直接回车即可
Partition number (4-128, default 4):
# 这里提示你设置新分区的起始扇区,fdisk 已经给你计算好了,通常不自己设置
# 直接回车保持默认值即可
First sector (209713152-629145566, default 209713152):
# 这里提示你设置新分区的结束扇区,默认使用了所有磁盘的空闲空间
# 所以不用设置结束扇区,保持默认值,回车即可
Last sector, +/-sectors or +/-size{K,M,G,T,P} (209713152-629145566, default 629145566):

Created a new partition 4 of type 'Linux filesystem' and of size 200 GiB.

# 分区创建好后再用 p 命令查看以下,可以看到多了一个 /dev/sda4 分区
# 大小为 200G
Command (m for help): p

Disk /dev/sda: 300 GiB, 322122547200 bytes, 629145600 sectors
Disk model: Virtual disk
Units: sectors of 1 * 512 = 512 bytes
Sector size (logical/physical): 512 bytes / 512 bytes
I/O size (minimum/optimal): 512 bytes / 512 bytes
Disklabel type: gpt
Disk identifier: BC2BADF6-5A06-4531-ADA9-17DD83BFB1E1

Device Start End Sectors Size Type
/dev/sda1 2048 4095 2048 1M BIOS boot
/dev/sda2 4096 2101247 2097152 1G Linux filesystem
/dev/sda3 2101248 209713151 207611904 99G Linux filesystem
/dev/sda4 209713152 629145566 419432415 200G Linux filesystem

# 分区创建好后,fdisk 并未将更改写到磁盘中,确认无误,需要写入修改后
# 执行 w 命令写入修改,fdisk 会写入修改并退出
Command (m for help): w
The partition table has been altered.
Syncing disks.

root@mf:~#

2.3.3、将新分区初始化为 PV(物理卷)

使用命令 pvcreate /dev/sda4 将新建的分区初始化为 PV(物理卷)

1
2
root@mf:~# pvcreate /dev/sda4
Physical volume "/dev/sda4" successfully created.

使用命令 pvscan 查看当前有那些 PV(物理卷),
可以看到我们一个 200G 的 PV(物理卷)已经创建好了

1
2
3
4
root@mf:~# pvscan
PV /dev/sda3 VG ubuntu-vg lvm2 [<99.00 GiB / 0 free]
PV /dev/sda4 lvm2 [200.00 GiB]
Total: 2 [<299.00 GiB] / in use: 1 [<99.00 GiB] / in no VG: 1 [200.00 GiB]

2.3.4、将 PV(物理卷)添加到 VG(卷组)中

使用命令 vgdisplay 查看当前卷组信息:

字段 说明
VG Name ubuntu-vg VG 名称为 ubuntu-vg
Alloc PE Size 25343 / <99.00 GiB 已经分配的容量 100G 左右
Free PE / Size 0 / 0 可分配的容量 0G
1
2
3
4
5
6
7
8
9
10
11
12
13
14
15
16
17
18
19
20
21
root@mf:~# vgdisplay
--- Volume group ---
VG Name ubuntu-vg
System ID
Format lvm2
Metadata Areas 1
Metadata Sequence No 3
VG Access read/write
VG Status resizable
MAX LV 0
Cur LV 1
Open LV 1
Max PV 0
Cur PV 1
Act PV 1
VG Size <99.00 GiB
PE Size 4.00 MiB
Total PE 25343
Alloc PE / Size 25343 / <99.00 GiB
Free PE / Size 0 / 0
VG UUID yMzWnl-BVP4-3AGH-gbkL-2SEs-WnKa-qfiJbk

使用命令 vgextend ubuntu-vg /dev/sda4 将新建的 PV(物理卷)/dev/sda4 添加到 VG(卷组) ubuntu-vg

1
2
root@mf:~# vgextend ubuntu-vg /dev/sda4
Volume group "ubuntu-vg" successfully extended

使用命令 vgdisplay 再次查看当前卷组信息:

字段 说明
VG Name ubuntu-vg VG 名称为 ubuntu-vg
Alloc PE Size 25343 / <99.00 GiB 已分配的容量 100G 左右
Free PE / Size 0 / 0 可分配的容量 200G 左右
1
2
3
4
5
6
7
8
9
10
11
12
13
14
15
16
17
18
19
20
21
22
23
root@mf:~# vgextend ubuntu-vg /dev/sda4
Volume group "ubuntu-vg" successfully extended
root@mf:~# vgdisplay
--- Volume group ---
VG Name ubuntu-vg
System ID
Format lvm2
Metadata Areas 2
Metadata Sequence No 4
VG Access read/write
VG Status resizable
MAX LV 0
Cur LV 1
Open LV 1
Max PV 0
Cur PV 2
Act PV 2
VG Size 298.99 GiB
PE Size 4.00 MiB
Total PE 76542
Alloc PE / Size 25343 / <99.00 GiB
Free PE / Size 51199 / <200.00 GiB
VG UUID yMzWnl-BVP4-3AGH-gbkL-2SEs-WnKa-qfiJbk

可以看到 VG(卷组)中多出了 200G 的可分配容量,这时 VG 的容量已经拓展好了,接下来就是将 VG(卷组)的容量划分到 LV(逻辑卷)上了

2.3.5、将 VG(卷组)的可分配容量划分到 LV(逻辑卷)中

使用命令,lvextend -l +100%FREE /dev/ubuntu-vg/ubuntu-lv VG(卷组)中的所有可分配容量全部划分到 LV(逻辑卷)/dev/ubuntu-vg/ubuntu-lv

1
2
3
root@mf:~# lvextend -l +100%FREE /dev/ubuntu-vg/ubuntu-lv
Size of logical volume ubuntu-vg/ubuntu-lv changed from <99.00 GiB (25343 extents) to 298.99 GiB (76542 extents).
Logical volume ubuntu-vg/ubuntu-lv successfully resized.

2.3.6、同步文件系统容量到内核

做完所有操作后,需要使用命令 resize2fs /dev/ubuntu-vg/ubuntu-lv 将 LV(逻辑卷)的信息同步到内核中,否则你的逻辑卷的容量大小将不会改变

1
2
3
4
5
6
7
root@mf:~# resize2fs /dev/ubuntu-vg/ubuntu-lv
resize2fs 1.45.5 (07-Jan-2020)
Filesystem at /dev/ubuntu-vg/ubuntu-lv is mounted on /; on-line resizing required
old_desc_blocks = 13, new_desc_blocks = 38
The filesystem on /dev/ubuntu-vg/ubuntu-lv is now 78379008 (4k) blocks long.

root@mf:~#

使用 df -h 命令查看 LV(逻辑卷)大小

1
2
3
4
5
6
7
8
9
10
11
12
13
14
15
16
17
18
root@mf:~# df -h
Filesystem Size Used Avail Use% Mounted on
udev 1.9G 0 1.9G 0% /dev
tmpfs 394M 1.3M 392M 1% /run
/dev/mapper/ubuntu--vg-ubuntu--lv 294G 44G 239G 16% /
tmpfs 2.0G 0 2.0G 0% /dev/shm
tmpfs 5.0M 0 5.0M 0% /run/lock
tmpfs 2.0G 0 2.0G 0% /sys/fs/cgroup
/dev/sda2 974M 205M 702M 23% /boot
/dev/loop2 64M 64M 0 100% /snap/core20/1778
/dev/loop0 56M 56M 0 100% /snap/core18/2679
/dev/loop1 56M 56M 0 100% /snap/core18/2697
/dev/loop4 92M 92M 0 100% /snap/lxd/24061
/dev/loop3 64M 64M 0 100% /snap/core20/1822
/dev/loop6 92M 92M 0 100% /snap/lxd/23991
/dev/loop7 50M 50M 0 100% /snap/snapd/18357
/dev/loop5 50M 50M 0 100% /snap/snapd/17950
tmpfs 394M 0 394M 0% /run/user/1000

可以看到 LV(逻辑卷)/dev/mapper/ubuntu--vg-ubuntu--lv 的大小已从开始的 100G 增加到了 300G


增加LVM逻辑卷容量
http://example.com/2023/02/27/增加LVM逻辑卷容量/
作者
MangFu
发布于
2023年2月27日
许可协议